Knowledge Base
Admin
- Admin OverviewAdmin Users
- Granting User Access for Designer Portal
- Setting up Welkin Users
- New Users: Add, Delete, Modify
- Provide Access to Users
- Reset User Passwords
- Changing user's email
- Assigning Seats and Licenses
- User Announcements
- Configuring Two-Factor Authentication
- Security Policies: Attribute Based Access Control
- Security Audit
- Data Audit
- Phone Tree Audit
- How to turn on your communication methods
- Admin OverviewAdmin Users
Care
- Care OverviewCare Home
- Home Screen
- Logging into Care
- Roles
- How to create and configure roles
- User Profile
- Notifications and Alerts
- Insights
- Patients
- Patient Profile
- Patient Profile
- Patient Profile: Editing Patient Information
- My Patients: Create and Search
- My Patients and Bulk Edits/Actions
- Patient Care Teams
- Patient Programs and Phases
- Goals
- Forms and Assessments
- Creating Forms and Assessments
- Charts & Graphs
- Document Management
- Documents: Uploading
- Data Views
- Encounters: Overview
- Encounters Overview
- Encounters: Create, Modify, complete
- Encounters: Draft Mode and Finalizing Notes & Assessments
- Encounters: Patient Profile
- Communication Center
- Manage Unrecognized Communication
- Creating a Message Template
- Communication Center: Calls
- Communication Center: Chat
- Communication Center: SMS
- Communication Center: Email Functionality
- Care OverviewCare Home
Designer
- OverviewDesigner Version History
- Visual Components
- Security Policy Detail
- Enable Patient Delete
- Brand Terminology: Flexibility
- Designer Overview
- Forms: Conditional Logic
- Programs and Phases
- Webhooks
- Custom Data Types (CDT)
- Change Summary and Version History
- Patient Data View
- Help Section
- Custom Field Types
- Create Advanced Automations
- Create Security Policies
- Visual Components & Dependencies
- Automated Notifications
- Automations That Trigger Outbound Communications
- CDT Configuration
- Charts & Graphs: How to Configure
- Create Formulaic Custom Data Type Fields
- Create Patient Facing Assessment (PFA) Folders
- Configure Help Section
- Configure Phone Names
- Customize Action Bar
- Defining Regions and Territories
- Document Types: How To Configure
- Filtering With Message Template Variables
- How to Add Assessments to a Template
- Filtering With Message Template Variables
- How To Associate Assessments with Programs
- How to Create Navigation Layouts
- How To Create an Assessment or Form Template
- Task Management
- Opt Out Patients from SMS Communications
- Assessments - How to Add Conditionality
- Charts & Graphs: Filter, change date and by data point
- Create User Notifications
- Create Automated Appointment Reminders
- Turning on Notifications for Communications
- Create PDFs from Forms & Assessments
- Configuring Security Policies
- Designer: Enable Patient Delete
- Designer: How to Configure Scored Assessments
- Designer: How to Create Automations
- Encounters: Dependencies
- Export Designer Configuration
- Task Creation
- Task Management
- OverviewDesigner Version History
Integrations
- Integration OverviewIntegration Information
- Acuity Set up
- eRX: Implementation Checklist
- eRx: Overview
- eRx: Setup and Configuration
- eRX: IDP Quick Tips
- eRX: Tokens
- eRX: Completing the EPCS invitation and Logistical Access Control
- eRX: How to Reset the EPCS Passphrase
- eRX: Prescribe Tapered, Titrated, & Variable Dose Medications
- eRX: Reporting
- Labs: Overview
- Labs: Setup and Configuration
- Labs: Creating a Lab Order in Health Gorilla
- Labs: Creating a Quick Order Lab in Health Gorilla
- DocuSign: Implementation Checklist
- DocuSign: Authorization
- DocuSign: Setup and Configuration in Admin
- DocuSign: Setup and Configuration in Designer
- DocuSign: Feature Overview in Care
- DocuSign: Feature Overview in Designer
- DocuSign: Creating Templates
- Docusign: Go Live Process
- eSignature Configuration
- Zoom: Setup and Configuration
- Zoom: How to use telehealth in Designer
- Zoom: Where Do I Find My Zoom ID?
- Zoom: Setting Up Waiting Rooms
- Sisense: Change Requests
- Paubox: Setup and Functionality
- Google Calendar Integration
- Welkin Calendar Synchronization App
- Stripe: Setup and Configuration
- Phone Tree Implementation
- Twilio: A2P Questions & Answers
- SSO Setup
- Configuring Google Single Sign On
- OneLogin: Setup and Configuration
- Integration OverviewIntegration Information
Developer/APIs
Support
June 2023 Newsletter
Unrecognized Communications Assignments, Chat Enhancements, From Number Configuration & More
Platform: new releases & updates
Care: auto-assign Unrecognized Communications
You can now auto-assign Unrecognized Communications in the instance where there is a shared phone number or email on multiple profiles – multiple patients, patient-related contacts, or a combination of both.
Key features:
- To make it more convenient, we introduced an auto-assign feature. This feature allows you to choose a patient or patient related contact as the default assignee when assigning a message or call to a patient. Once set, the system will automatically route incoming communications to the assigned patient’s Communication Center until a different default assignee is specified or the default assignee is removed.
- Note: a default assignee field will be displayed only if there are duplicate emails or phone numbers in the system

Designer: “From” number configuration for SMS automations
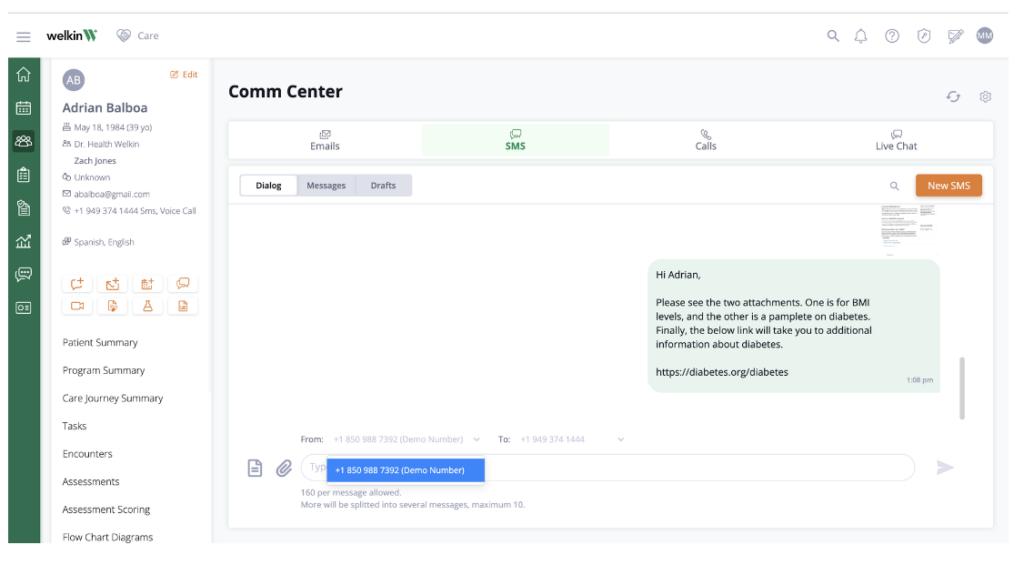
For those who utilize multiple phone numbers, this new feature allows you to specify the sending phone number, thereby improving SMS-related automations and creation of draft SMS.
Key features:
- A new section called Phone Names has been added in Designer, it allows you to create names for phones, which can be referenced during automation configuration
- To associate names with phone numbers, you will need to indicate the correspondence between the phone and the name within Admin’s Integrations tab, specifically the Communication page. If a name is specified in an automation but no phone is associated with that name, the automation will not be executed. This can be tracked in automation logs.
- The assigned Phone Names will also be displayed in Care’s Communication Center, specifically in the “From” field. Additionally, you can find these phone names in the Designer Portal’s Phone Trees page. It is possible to leave the “From” number empty in automation. In this case, the system will behave as it does currently and use the phone number marked as “Main” in the Admin settings.
- Please note that the phone number selected for the automation will take precedence over a phone number set as default on a patient profile. If you have configured a default number for a patient, it will only be utilized if no specific phone number is chosen for the automation.
- At present, certain phones are already assigned names through Welkin’s internal Admin system, managed by our support department
- This modification will grant you the ability to independently manage the names instead of relying on support.
- We kindly request you replace the existing labels by generating your own. We plan to decommission these names in the future and display only the phone names set within Designer.

Chat enhancements: design, readability, and emojis
We have updated chat functionality for an improved experience
Key features:
- Enhanced chat design and readability: notable changes include the relocation of the search field to the right side for improved accessibility. Moreover, messages from logged-in users are now displayed on the right side, while messages from patients and other care members appear on the left side. Additionally, the sender’s First and Last Name are now shown for messages, with the label “Patient” assigned specifically to patient messages.
- Introduction of emoji support in Chat: users can now utilize unicode emojis in their Chat conversations, allowing them to send and receive emojis

APIs: open Profiles for external users
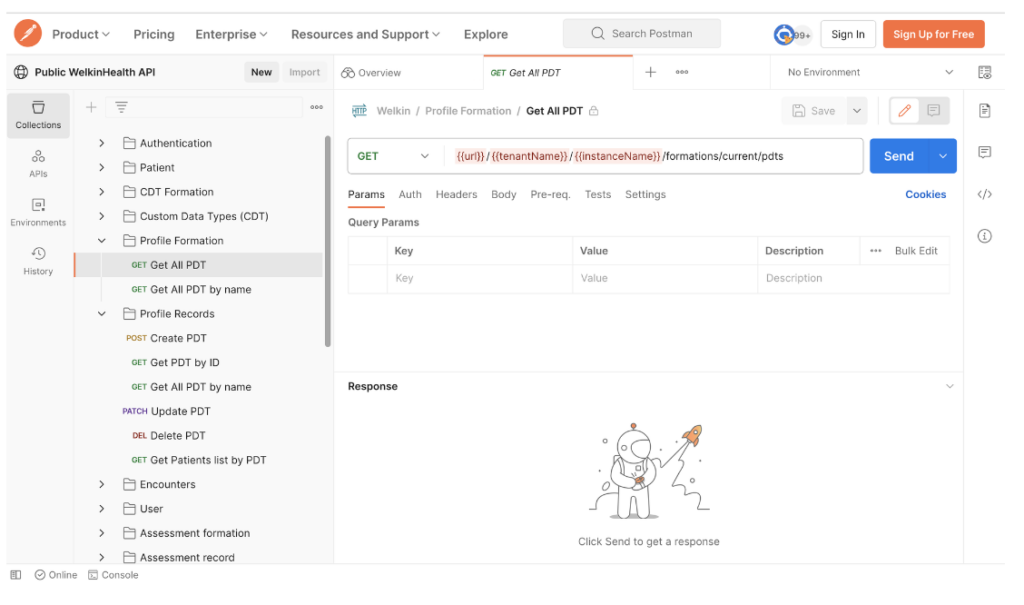
With this release, we’re enabling the ability to interact with Profiles (including actions like get, create, and update) through our API.
Key features:
- Profiles in Welkin are “generic” objects that can represent individuals as well as non-person lists such as ICD-10, CPT codes, family members, doctors, and non-Welkin care staff, etc.
- Profiles are backed by CDT’s, so it’s possible to customize them
- Documentation is available in the Welkin Public collection on Postman

To stay up to date on product updates and releases, subscribe to our Status Page and check out our Release Notes for a comprehensive list of feature updates and bug fixes. For additional product support, file tickets using our Support Center, visit our API Documentation, or our Knowledge Base.
Please reach out to us at CSM@welkinhealth.com if you have any questions about these updates.
Stay Well,
The Welkin Team

