Knowledge Base
Admin
Admin Overview
Admin Users
Admin Security
Admin Environments & APIs
New Users: Add, Delete, Modify
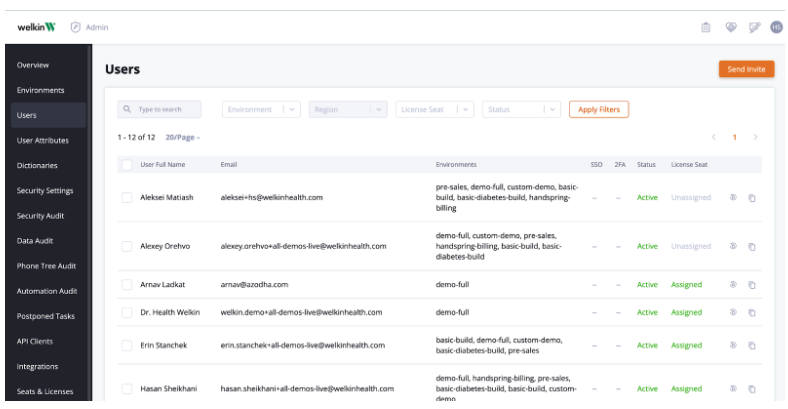
New users of the system are added in the Admin portal of Welkin. In the Admin portal on the left side menu navigate to Users. A list of all Active and Inactive users will be displayed. As an Administrator you will be able to view a quick snapshot of each User’s permissions and security settings:
- Full Name
- Environment
- SSO
- MFA
- Status
- License Seat
To add a new user you may choose from two methods:
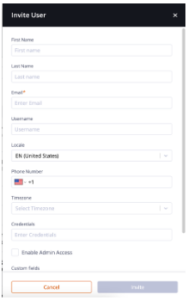
- Send Invite
- Copy User (preferred), when permissions are the same
With both methods you will need to add the general user information in order to send an Invite.
The first method, Sending Invite, will allow you to input all of the Users information. Then you will have to manually navigate back to the user and configure the User from scratch.
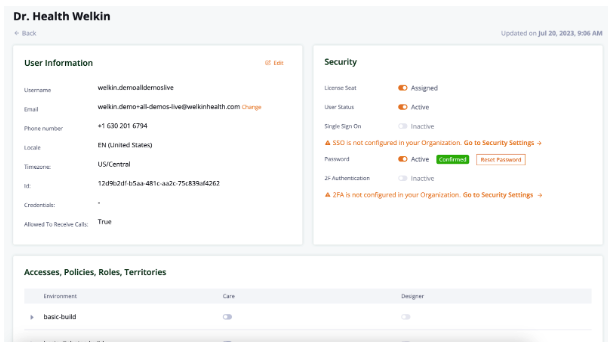
Once a User has received an invitation and set a new password, the User Status will change to Active. Next, as soon as the User has received an invitation and has set a new password the User Status will change to Active. As an Administrator you will next need to log back into the Admin to modify the User’s permissions in each section:
- User Information
- Security
- Accesses, Policy, Role & Territories
- Admin Access

The second method, Copy User, is a preferred method to add new users. Copy User, will allow you to copy an existing User’s configuration and the only requirement will be to enter the general user information and select Invite. Once a preferred method has been chosen you will need to enter the following information:
- First Name
- Last Name
- Username (autogenerated)
- Locale
- Phone Number
- Timezone
- Credentials
- Enable as an Admin
- Custom Fields
- Allowed to Receive Phone Calls
Under the “User” tab you will be able to modify this section by selecting the Edit icon at the top right corner of each section:
- Username
- Phone Number
- Locale
- Timezone
- ID (non editable)
- Credentials
- Enable Admin Access
- Allowed to Receive Calls
The “Security” tab is where you can assign License Seats, security settings and reset passwords. In order to edit any of the following settings you will need to select the toggles on or off.
- License Seat
- User Status
- Single Sign On (will be configured in Security Settings)
- Password (reset)
- 2FA (will be configured in Security Settings)
The “Accesses, Policy, Role & Territories” tabs will allow you to manage which environments and roles the User will partake. Please note: Policies, Roles and Territories are configured in the Designer portal. To give or deny access to environments and portals you will need to select the toggles for Care and Designer in each Environment. To modify or add an User’s Policies, Roles, and Territories you will select the Edit icon on the right side of each Environment and hit Save.
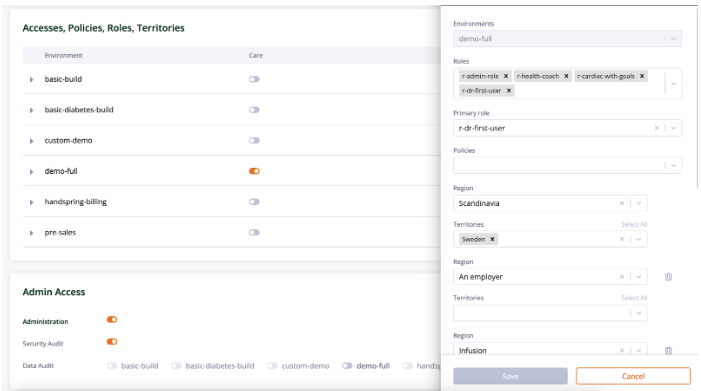
Admin Access is where an Admin can assign Users permissions to be an Administrator, Data Audit access and/or Security Audit access. Data and Security audit logs are accessible only in the Admin portal.
NOTE: Any toggles or check boxes marked will automatically save in the User’s profile.
More Questions?
If you have any questions, please visit the Welkin Health Knowledge-Base or contact your Implementation/CSM for more information.