Knowledge Base
Integrations
Integration Overview
Integration Information
- Acuity Set up
- eRX: Implementation Checklist
- eRx: Overview
- eRx: Setup and Configuration
- eRX: IDP Quick Tips
- eRX: Tokens
- eRX: Completing the EPCS invitation and Logistical Access Control
- eRX: How to Reset the EPCS Passphrase
- eRX: Prescribe Tapered, Titrated, & Variable Dose Medications
- eRX: Reporting
- Labs: Overview
- Labs: Setup and Configuration
- Labs: Creating a Lab Order in Health Gorilla
- Labs: Creating a Quick Order Lab in Health Gorilla
- DocuSign: Implementation Checklist
- DocuSign: Authorization
- DocuSign: Setup and Configuration in Admin
- DocuSign: Setup and Configuration in Designer
- DocuSign: Feature Overview in Care
- DocuSign: Feature Overview in Designer
- DocuSign: Creating Templates
- Docusign: Go Live Process
- eSignature Configuration
- Zoom: Setup and Configuration
- Zoom: How to Configure Zoom in Designer
- Zoom: Where Do I Find My Zoom ID?
- Zoom: Setting Up Waiting Rooms
- Sisense: Change Requests
- Paubox: Setup and Functionality
- Google Calendar Integration
- Welkin Calendar Synchronization App
- Stripe: Setup and Configuration
- Candid: Setup and Configuration
- Candid Integration - Required Fields
- Pre-authorization
- Phone Tree Implementation
- Twilio: A2P Questions & Answers
- SSO Setup
- Configuring Google Single Sign On
- OneLogin: Setup and Configuration
Integration Support
Zoom: How to Configure Zoom in Designer
Welkin’s integration with Zoom allows you to display and send a user’s Zoom ID when scheduling Telehealth appointments with patients.
This article will include the following:
- Adding the action button to the action bar
- Associating a users Zoom ID to their user profile in Welkin
- Creating a message template with the zoom variable
- Creating an automation to send telehealth encounter information
………………………………………………………
 Adding the action button to the action bar
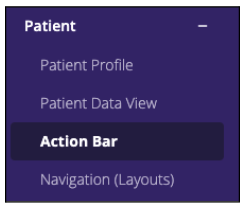
In Designer, scroll down on the left hand menu. Select Action Bar under the Patient heading.
In the Available Action Buttons, click on the + sign next to Zoom, or drag and drop the Zoom button to move this over to the Visible Action Buttons.
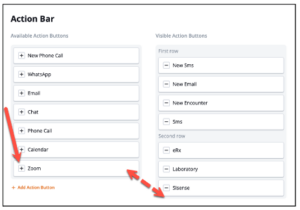
NOTE: Only 4 action buttons are allowed per row
Click on Save Changes when completed.
After this draft has been published, the Zoom button (which appears as an icon of a video camera) will display in the action bar of a patient profile.
………………………………………………………
Associating a users Zoom ID to their user profile in Welkin
Log into Admin to associate the Zoom Action Bar button with a user’s Zoom ID.
NOTE: Please review this article regarding where to find a user’s Zoom ID
In the left menu bar, select Users. Select the name of the user that you want to add the Zoom ID to.
In the User Information section, click Edit.
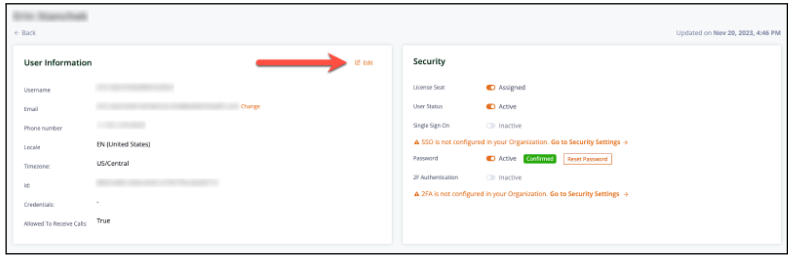
A sidebar will appear which will include – and allow editing – of the selected users information.
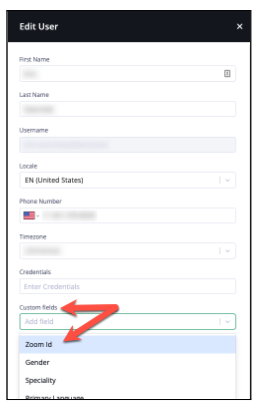
Click on the dropdown under Custom Fields and select Zoom ID.
Select the + Add button
A field will appear labeled Zoom ID. Enter the user’s Zoom ID and click Save.
………………………………………………………
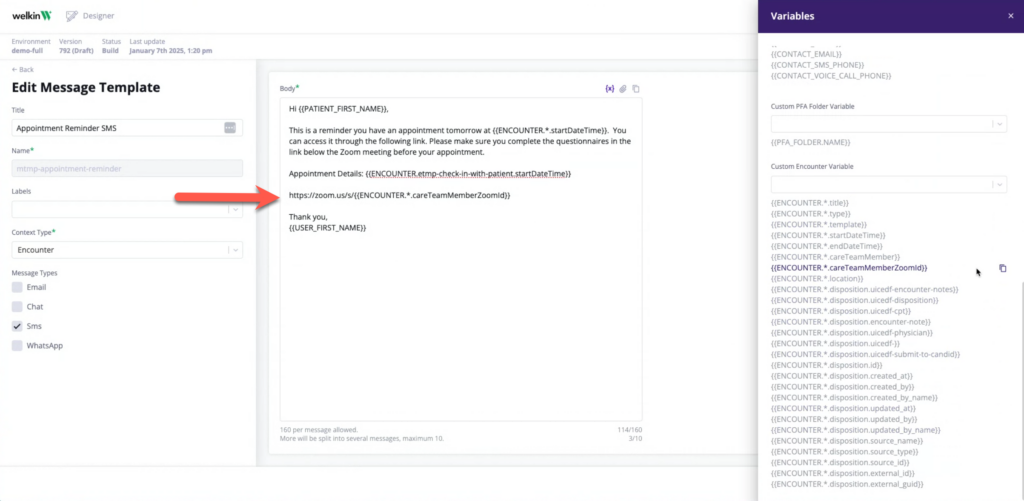
Creating a message template with the zoom variable
The encounter for which the Telehealth session will occur needs to be associated with a message template that includes the zoom variable.
In Designer, scroll down the left vertical menu and select Message Templates and click on +New.
- Enter the Title of the new message template – this will auto-populate the Name field. (The Name field can be edited after the Title is entered).
- Select a Label from the dropdown menu (optional – only applicable if labels have been configured)
- In the Context Type dropdown, select
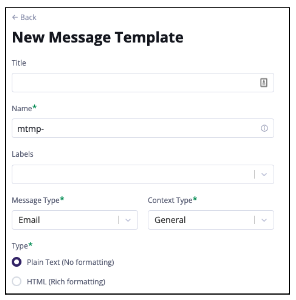
 Encounter.
 - Indicate whether the Message Template should be Plain Text (No Formatting) or HTML (Rich Formatting) by selecting the appropriate radio button.
- If the message type selected was Email – enter the subject line.
- Start entering text into the Body of the message.
- Clicking on the {x} button will open a side panel which will allow you to copy different variables to merge into the template.
- To enter the Zoom ID, scroll down to the encounter variables and select the copy button next to {{ENCOUNTER.*.careTeamMemberZoomId}} and paste this into the template.
- After entering all verbiage and variables click on Save Changes.
.
……………………………………………………..
Creating an automation to send telehealth encounter information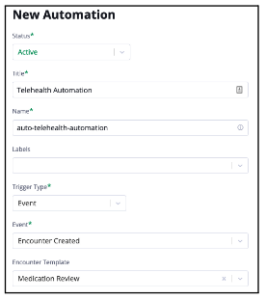
To send the encounter information containing the Telehealth information to the patient, an automation must be created. Note: The Encounter Template must have the Video delivery method selected
- In the left hand vertical menu select Automations and click on +New.
- The Status drop down enables or disables an automation. Enter the Title for the automation that reflects the functionality.The Name field will auto-populate based on the title and can be edited.
- Select a Label from the dropdown menu (optional – only applicable if labels have been configured)The Trigger Type allows an automation to fire based on an Event, a Scheduled Event, or a Recurring Event.
- Select the Event from the dropdown menu that will trigger the automation. Select the corresponding Encounter Template from the dropdown menu. In the Actions section, select the Action Type in the dropdown menu according to how you will be sending the telehealth appointment information to the patient.
- Select the Message Template you created in the previous step in the Message Template dropdown.
- Click on Save Changes.
To learn more about Zoom for Telehalth you can visit these additional Knowledge Base articles:

More Questions?
If you have any questions regarding Zoom , please visit the Welkin Health Knowledge-Base or contact your Implementation/CSM for more information.