Knowledge Base
Designer
Designer Overview
Designer Version History
Designer Automations
Designer Programs
Designer Profiles
Designer Patients
Designer Custom Data
Designer Visual Components
- Visual Components
- Visual Components & Dependencies
- Filtering With Message Template Variables
- Filtering With Message Template Variables
- How To Create an Assessment or Form Template
- How To Associate Assessments with Programs
- How to Add Assessments to a Template
- How to Configure Scored Assessments
- Create PDFs from Forms & Assessments
- Create Patient Facing Assessment (PFA) Folders
- Charts & Graphs: How to Configure
- Charts & Graphs: Filter, change date and by data point
- Forms: Conditional Logic
Designer Access Control
Designer Task Management
Designer Encounters
Designer Communications
Designer Terminology
Designer Help Page
Assessments – How to Add Conditionality
Welkin Health provides organizations the ability to create and use conditionality in Assessments. This gives you the ability to show or hide fields on the Assessment, based on another response in the Assessment.
To create a condition in an Assessment, you should follow three build steps:
- Create CDTs and CDTFs for the questions you’ll be using
- Create the Assessment(s) that will use these CDTs and CDTFs
- Add the Conditional logic in the Assessment
Step 1: Create CDTs and CDTFs
The process to create these elements is the same as creating any other CDT, but does require some forethought. A conditional statement can reference within a single CDT or across multiple CDTs. The easiest and most typical use is one CDT, with one CDTF that is a list that includes a value for “Other,” and then another CDTF for inputting “If Other” type information.
You simply create a CDTF for both values, either in one CDT like the below, or across two CDTs, if needed.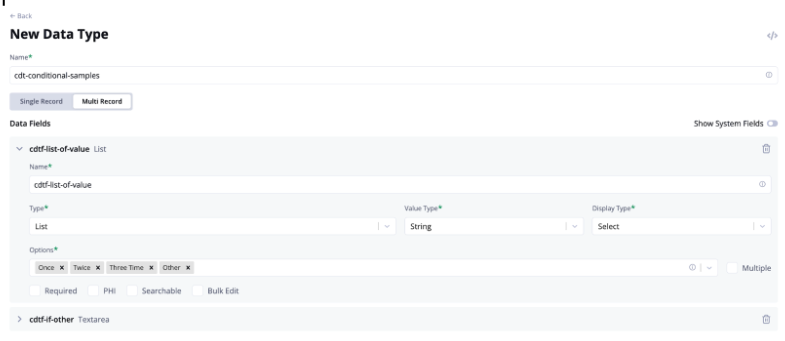
Step 2: Create the Assessment
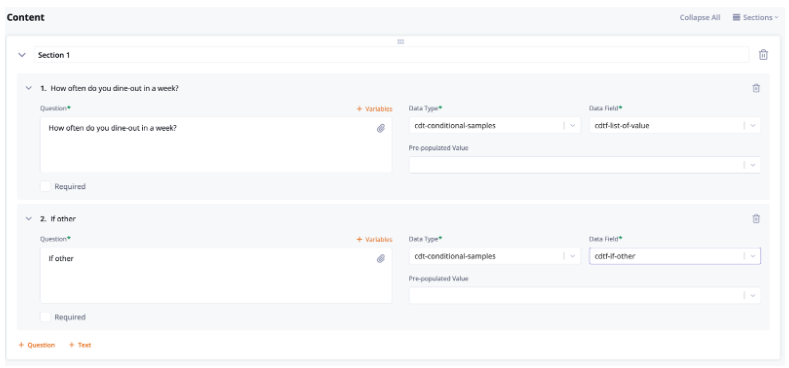
Creating an Assessment with conditionality is the same as creating any other Assessment. However, when you build the Assessment, make sure and create the question set as it would appear if all conditions were to be met; and in the correct question order. It will still work if you add all your “if true” conditions at the end of the Assessment but you may not like the behavior in Care when viewing the Assessment, due to how the fields can shift and seemingly change order.
Step 3: Add the Conditional logic in the Assessment
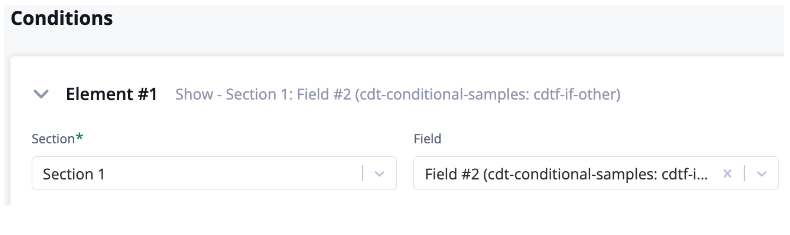
Once you have all of your questions in the Assessment, Click on the “Conditions” menu item on the left of the Assessment screen.
Click “+Element” to begin.
You will now start by referencing the question that you want to appear, if your condition is met. Think of it almost as a “then, if” statement. So if I want to display my field that contains the “Other” information, I will start by referencing that field.
Choose the Section and Field of the question you want to show or hide based on the condition.
Next choose whether to show or hide the field, when the condition is met.
Finally, choose an Operation type of “And” or “Or.” “And” is used if there is only one way to meet the condition, while “Or” is used if there are multiple ways.
Now, choose the field you want to use as the condition that must be met. In most cases, you’ll use the “Field” reference as this refers to a field in this same Assessment. If you want to reference a CDT created elsewhere in the system, use the “Data Type” option.
Choose your Operator (=, Contains, Doesn’t Contain, etc) and then input the reference value.
If multiple conditions are needed, click “+ Condition” to stack more conditions.
Once you’ve completed this conditional element, you can create more within the same Assessment.
Tips and tricks:
- You can conditionally display read-only fields as well to provide additional instructions.
- Changing the order of questions in the Assessment after conditions have been created will possibly cause you to need to redo the conditionality
- Be cautious of putting a mandatory field behind a condition as it can make for a clunky UX or confusion when completing an Assessment.
More Questions?
If you have any questions, please visit the Welkin Health Knowledge-Base or contact your Implementation/CSM for more information.