Knowledge Base
Designer
Designer Overview
Designer Version History
Designer Automations
Designer Programs
Designer Profiles
Designer Patients
Designer Custom Data
Designer Visual Components
- Visual Components
- Visual Components & Dependencies
- Filtering With Message Template Variables
- Filtering With Message Template Variables
- How To Create an Assessment or Form Template
- How To Associate Assessments with Programs
- How to Add Assessments to a Template
- How to Configure Scored Assessments
- Create PDFs from Forms & Assessments
- Create Patient Facing Assessment (PFA) Folders
- Charts & Graphs: How to Configure
- Charts & Graphs: Filter, change date and by data point
- Forms: Conditional Logic
Designer Access Control
Designer Task Management
Designer Encounters
Designer Communications
Designer Terminology
Designer Help Page
Designer: Profiles Overview
Profiles store information about third parties that also engage with your organization or patients. For example, profiles are frequently used as a repository of external providers who are outside of your organization, such as: provider referrals, hospitals, family members, or specialists. Profiles are also used for dx, CPTs, or other medical code sets which may be used in your organization.
Creating Profiles in Designer is a multi-step process:

- Create the Profile: In the Profile section of Designer, click on “Profiles” and then the “+New” button. These areconfigured similar to CDTs, so name your profile, and then create fields to store name, phone, email, etc for the Profile. If this is a Profile that you will want to communicate with via phone/SMS/email, check the box “Contactable within Patient”.
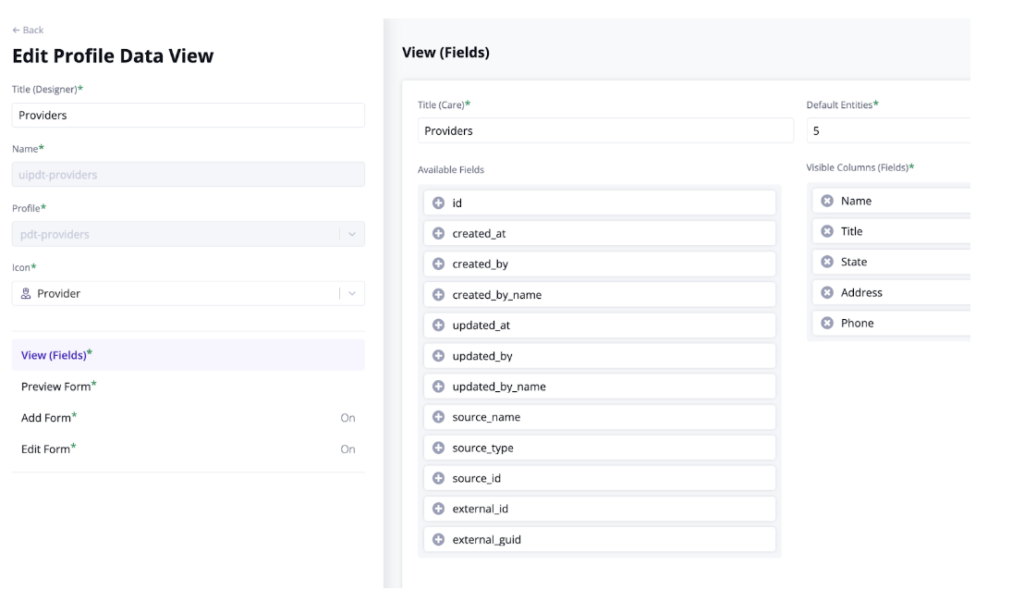
- Create the Profile Data View: In the same Profile section, select “Profile Data Views” and then the “+New” button. This configuration is similar to Data Views. First, name and select the Profile you are creating a view for, and then pick an Icon that best fits the Profile type. Next, configure how you would like to view the Profile, and what you want to see when Previewing, Adding, and Editing the Profile.

- Create a Profile Data Type:In order to establish an association between a particular Profile and a Patient, you need a Profile Data Type (CDT). Under Custom Data, select “Data Types” and then click on the “+New” button. Name your CDT, and then create at least one field (CDTF) that you want to display with the data that resides in the Profile. For example, if your Profile “pdt-doctors” has fields for title, name, address, and phone number, create a field called “profile-data” and then select type “pdt-doctors”. Once you do that, under the “Profile Fields” section, select as many of the fields that you want to display. This can be some or all of the name, address, and phone number fields. If you want to communicate with this Profile, make sure you include an email and/or phone field.
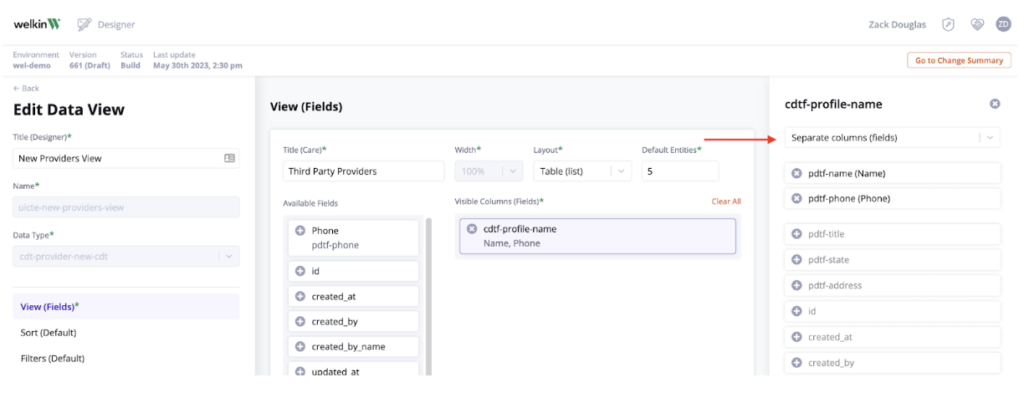
- Create a Data View: To establish and view the Profile(s) on a patient, you need a Data view associated with the CDT you just created. Select “Data Views” from the Visual Components section of Designer, and click on “+New”. Name your Data View, and then select the Data Type you just created. Here you will define what fields are visible in the Patient section for the Profile. This includes choosing options for View, Add, and Edit. When you choose fields available in View, any of the profile fields you created previously will also need a click on them so you can select one or more Profile fields. If you would like to communicate to a Profile via email or phone, you will also need to select, “Separate columns (fields).” This is because the Profile CDTF that you created could contain more than one Profile field, all combined (for example, displaying Title “MD” and Name “Mike” as a single value of “MD Mike”.

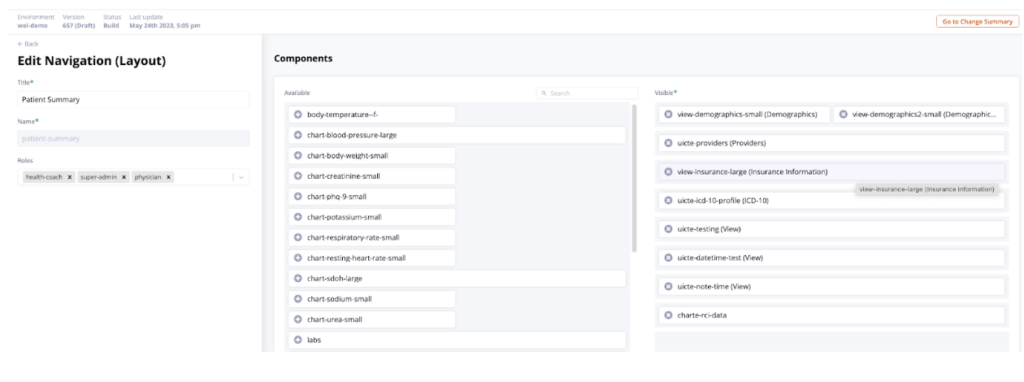
- Add the Data View to a layout: Navigate to the Navigation (Layouts) section under the Patient menu, and add your new Data View to one or more layouts per the normal process.

- Enable security policies: You have created new Data Types, so you need to also navigate to the Security Policies section of Access Control and update the policies for any users who will need this access.
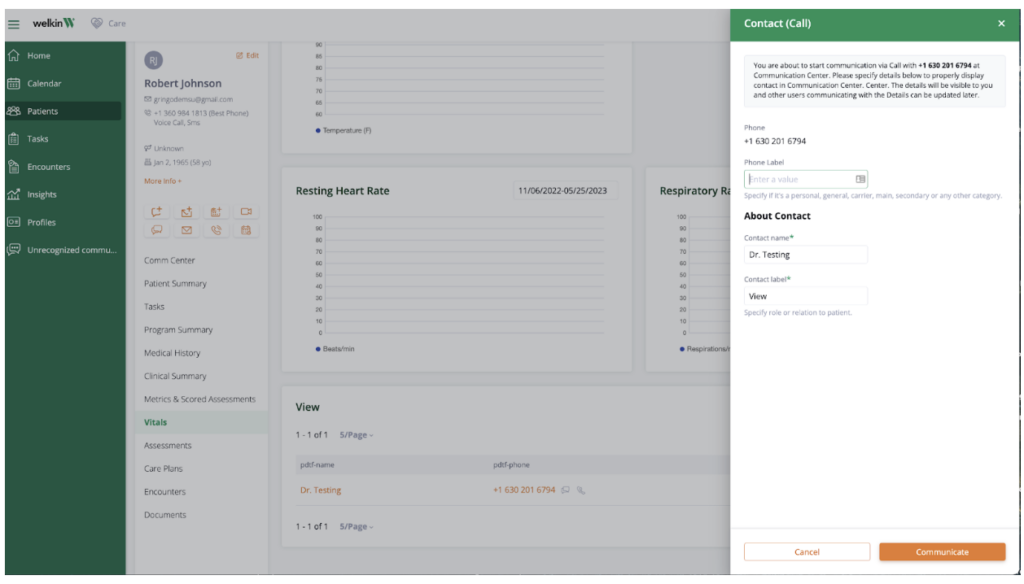
If a role does not have access to the Profiles menu in Care, that will also need to be added in Designer. Before you can see and associate/communicate with one of these Profiles, it must be added directly through the Profile area of Care, or through a particular patient and their Profile Data View. Once the Profile is created, you will “Add” it to the patient through the Profile Data View, which will establish the connection.
More Questions?
If you have any questions regarding the Profiles features please explore our Knowledge Base further or contact your Implementation/CSM for more information.