Knowledge Base
Designer
How To
- eSignature Configuration
- Custom Field Types
- Create Advanced Automations
- Create Security Policies
- Visual Components & Dependencies
- Automated Notifications
- Automations That Trigger Outbound Communications
- CDT Configuration
- Charts & Graphs: How to Configure
- Create Formulaic Custom Data Type Fields
- Create Patient Facing Assessment (PFA) Folders
- Configure Help Section
- Configure Phone Names
- Customize Action Bar
- Defining Regions and Territories
- Document Types: How To Configure
- Filtering With Message Template Variables
- How to Add Assessments to a Template
- Filtering With Message Template Variables
- How To Associate Assessments with Programs
- How to Create Navigation Layouts
- How To Create an Assessment or Form Template
- Patient Data View
- Zoom: How to use telehealth in Designer
- Opt Out Patients from SMS Communications
- Assessments - How to Add Conditionality
- Create User Notifications
- Create Automated Appointment Reminders
- Turning on Notifications for Communications
- Create PDFs from Forms & Assessments
- Configuring Security Policies
- How to create and configure roles
- Designer: Enable Patient Delete
- Designer: How to Configure Scored Assessments
- Designer: How to Create Automations
- Encounters: Dependencies
- DocuSign: Implementation Checklist
- Export Designer Configuration
- Task Creation
- Creating a Message Template
Overview
Features Overview
- Visual Components
- Security Policy Detail
- Task Management
- API Exports: Usage
- Designer: User Access
- DocuSign: Feature Overview in Designer
- Enable Patient Delete
- Brand Terminology: Flexibility
- Designer Overview
- Forms: Conditional Logic
- Programs and Phases
- Webhooks
- Notifications and Alerts
- Data Views
- Custom Data Types (CDT)
- Change Summary and Version History
- eRx: Overview
Create Automated Appointment Reminders
Automating appointment reminders is a simple process, but requires a couple items before building:
- Encounter type(s) that will be associated with the reminders
- Message template to be sent as the reminder (which includes a reference to the Encounter date/time fields)
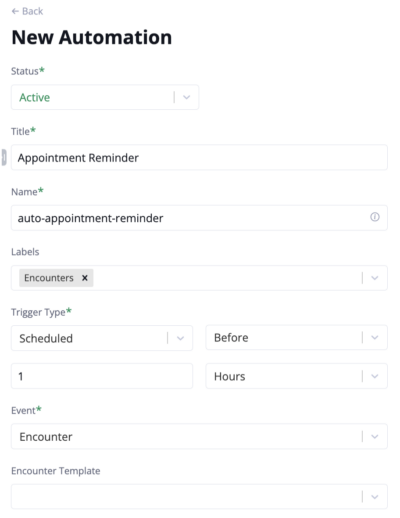
Once you have these created, navigate to “Automations” from the vertical menu bar in Designer, and Click on “+New” in the upper right corner.
Enter or make the following selections:
- Automation Title

- Automation Label (if desired)
- Trigger Type: Scheduled
- Set relative time you want the reminder to be sent (ie, 1hr before)
- Choose the particular Encounter template you want to send these for, if only one. If no Encounter type is selected the automation will trigger for all Encounter types
On the right, in the Conditions and Actions area:
- Add any conditional logic desired (optional)
- Select either SMS Patient, Chat Patient, or Email Patient, as the Action type, depending on the means of communication desired
- Choose the Message template you want to send.

That’s it! You are now ready to publish the automation!
More Questions?
If you have any questions regarding Automations , please visit the Welkin Health Knowledge-Base or contact your Implementation/CSM for more information.