Knowledge Base
Designer
Designer Overview
Designer Version History
Designer Automations
Designer Programs
Designer Profiles
Designer Patients
Designer Custom Data
Designer Visual Components
- Visual Components
- Visual Components & Dependencies
- Filtering With Message Template Variables
- Filtering With Message Template Variables
- How To Create an Assessment or Form Template
- How To Associate Assessments with Programs
- How to Add Assessments to a Template
- How to Configure Scored Assessments
- Create PDFs from Forms & Assessments
- Create Patient Facing Assessment (PFA) Folders
- Charts & Graphs: How to Configure
- Charts & Graphs: Filter, change date and by data point
- Forms: Conditional Logic
Designer Access Control
Designer Task Management
Designer Encounters
Designer Communications
Designer Terminology
Designer Help Page
How to Add Assessments to a Template
Welkin Health provides organizations the ability to embed Assessment in patient and team communications via Message Templates. To add a created Assessment to a Message Template, you should follow four build steps:
- Create a Form (Assessment)
- Configure a PFA Folder to contain the Assessment(s) you will want in the template
- Build a Message Template
- Incorporate the PFA Folder link
Step 1: Create a Form (Assessment) – See Knowledge Base Article here.
Step 2: Configure a PFA Folder
 APFA Folder serves as the vehicle for attaching an Assessment or multiple Assessments to a Message Template. It includes at least one Assessment type, and can also include custom formatting defining what a patient sees when interacting with the Assessment(s).
To create one, start by determining which Assessment(s) you will want in a particular Message Template. Navigate to “PFA Folders” under the Visual Components section of Designer. Click “+New” to begin.
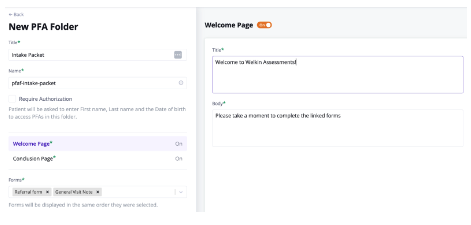
- Title the Folder: “Intake Packet” in our example
- Check or leave empty the “Require Authorization” box. If checked, a user receiving the link will need to confirm name and DOB to open it
- Create text for the “Welcome Page” and “Conclusion Page”
- Complete a Title for the Welcome Page, and the body of what the patient will see before opening the PFA folder (Optional, but if Disabled only one Assessment can be included in the Message Template)
- Complete the Conclusion page elements for Title and Body, if desired
- Assign the Assessment(s) that will present in this Folder. Save
OPTIONAL: Add Branding to the PFA Folders
You can create settings for your PFA folders so they appear in your company’s colors, contain the company log, and use the company’s font.
- From the “PFA Folders” page click on the palette icon next to the “+ New” icon.
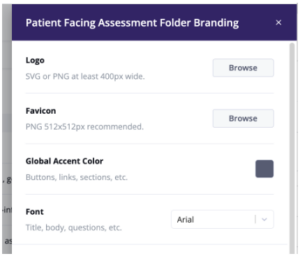

- Load your logo image, favicon, select the font, and choose your color. This will be how patients see the folder displayed.
- Save
Step 3: Build a Message Template – See Knowledge Base Article here.
Step 4: Incorporate the PFA Folder link:
- To the right of the “Body” box in the Message Template, scroll down if needed to see the “Custom PFA Folder Variable area.” Choose your PFA folder.
- Copy the link and paste it in the Body section.
You are now ready to Create Message Templates with Assessments!
Tips and tricks:
- A PFA Folder can be used across multiple Assessment templates (SMS, email, chat)
- Any Message Template can be sent through only one communication type at any one time.
- Message Templates that need Encounter field information should be set to Context Type “Encounter”
- Use Labels to help organize your Message Templates
More Questions?
If you have any questions, please visit the Welkin Health Knowledge-Base or contact your Implementation/CSM for more information.