Knowledge Base
Designer
Designer Overview
Designer Version History
Designer Automations
Designer Programs
Designer Profiles
Designer Patients
Designer Custom Data
Designer Visual Components
- Visual Components
- Visual Components & Dependencies
- Filtering With Message Template Variables
- Filtering With Message Template Variables
- How To Create an Assessment or Form Template
- How To Associate Assessments with Programs
- How to Add Assessments to a Template
- How to Configure Scored Assessments
- Create PDFs from Forms & Assessments
- Create Patient Facing Assessment (PFA) Folders
- Charts & Graphs: How to Configure
- Charts & Graphs: Filter, change date and by data point
- Forms: Conditional Logic
Designer Access Control
Designer Task Management
Designer Encounters
Designer Communications
Designer Terminology
Designer Help Page
Automated Notifications
Automations can be used to send notifications in more specific scenarios than those available as standard system Notifications (System Notifications)
The process to create an automation to send a Notification is the same as any other automation. You need a trigger event, any conditional logic, and then the Actions. Please see our article on Automations for information on creating an Automation.
(https://welkinhealth.com/kb/designer-how-to-create-automations/)
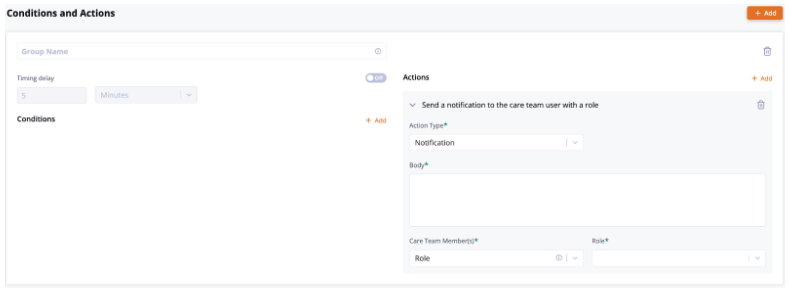
Once you have chosen your trigger and conditions, select “Notification” in the “Actions” area. Here you will be presented with 3 fields
- Body
- Care Team Member(s)
- Role(s)

The body is where you write the content that you’d like to appear in Care when this Notification is triggered.
Next, choose the Care Team Member(s) who you’d like to receive the notifications. There are three options: Role, Roles, Point of Contact, and Any User(s)
Role: Use this to send the notification to a particular role on the patient’s care team, regardless of if they are the primary contact or not. Examples: Nurse, Health Coach, Doctor
Roles: Use this to send the notification to multiple roles on the patient’s care team, regardless of if they are the primary contact or not. Examples: Nurse, Health Coach, Doctor
Point of Contact: Use this to send the notification to only the user assigned as the Primary Contact for a patient, regardless of their assigned role(s) in the system
Any User(s): Use this to send the notification to a particular role, even if they are not on the patient’s care team. This is typically used for escalations. Examples: Admin, Manager, etc.
Once you select one of the above options, you will select the name of a role or roles from the list provided in the adjacent field, comprised of any role types you have already created.
More Questions?
If you have any questions, please visit the Welkin Health Knowledge-Base or contact your Implementation/CSM for more information.