Knowledge Base
Designer
Designer Overview
Designer Version History
Designer Automations
Designer Programs
Designer Profiles
Designer Patients
Designer Custom Data
Designer Visual Components
- Visual Components
- Visual Components & Dependencies
- Filtering With Message Template Variables
- Filtering With Message Template Variables
- How To Create an Assessment or Form Template
- How To Associate Assessments with Programs
- How to Add Assessments to a Template
- How to Configure Scored Assessments
- Create PDFs from Forms & Assessments
- Create Patient Facing Assessment (PFA) Folders
- Charts & Graphs: How to Configure
- Charts & Graphs: Filter, change date and by data point
- Forms: Conditional Logic
Designer Access Control
Designer Task Management
Designer Encounters
Designer Communications
Designer Terminology
Designer Help Page
Create User Notifications
Designer: How to create User Notifications
User Notifications are used to alert Welkin users with many aspects of the program. Users can be notified regarding, but not limited to; new communications, task assignments, patient alerts, or even new patient creation. There are three options on how the system can send a User Notifications, In-app, SMS, or Email.

Within the Designer Portal you have the ability to utilize Welkin’s Default Notifications Templates or develop custom Notification Templates.
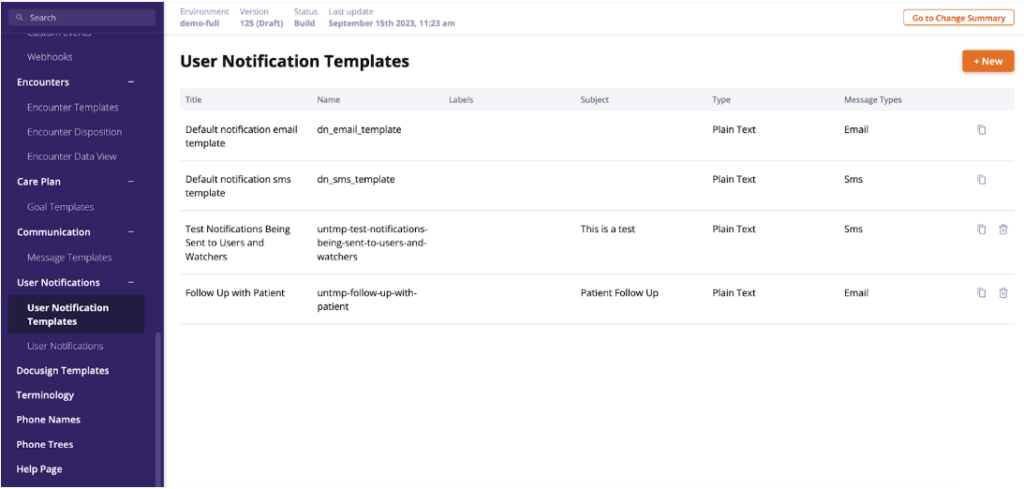
To create User Notifications you will need to start with logging into the Designer Portal. Next, select Create a Draft in orange at the top left of the window. Then, either using the search bar or scrolling down find and select User Notifications. You will see two options to select from User Notification Templates and User Notifications, we will first start with the User Notification Template.
The User Notification Template will allow you to create the template message verbiage and how the message will appear, In-app, SMS, or Email. To begin with creating a User Notification Template click on +New in orange at the top right of the window.

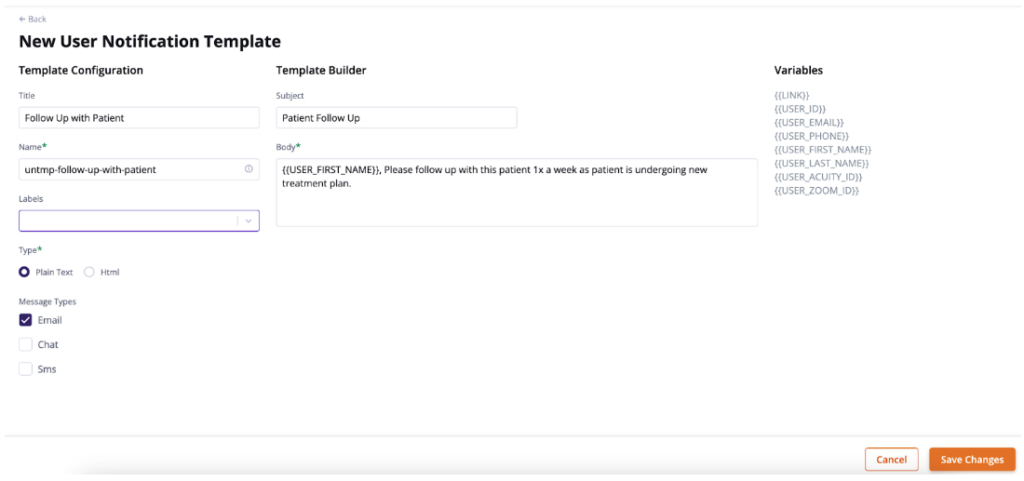
Now that we are on the New User Notification Template screen we can start to develop our template. Enter the information needed for the Template Configuration on the left:, Title, Name, Type and Message Type. Type, Plain Text vs HTML, will allow you choose the message body format. Next, we will complete the Template Builder in the center of the page. Simply enter the Subject and the message in the Body field. Here you can also utilize the Variables on the right side of the screen. The Variables are aimed towards the User to ensure no PHI information is leaked. The User can also utilize the {{LINK}} Variable to log in securely in Welkin’s Care App. Once complete select Save Changes at the bottom right of the window.
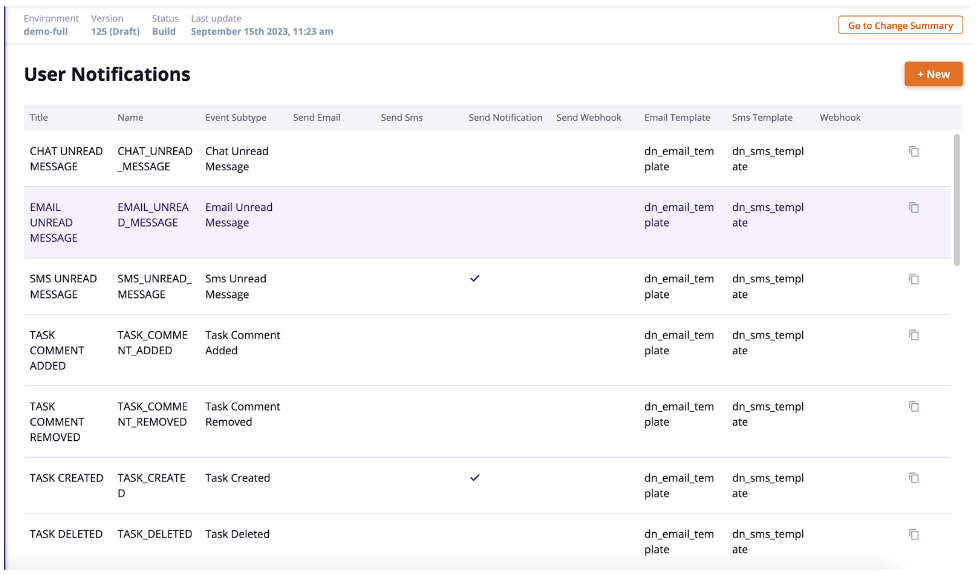
Next, we will move to the User Notifications tab on the menu bar. Once you select the User Notifications tab you will see a list of default notifications. This is where we will select where and how the notifications will appear to the Users. To begin creating a new Notification select +New at the top right hand corner of the window.

You will need to enter a Title and Name. Then select the Notification Type: Email, SMS, In-App Notification, or Webhook. As you select your Notification preference the communication templates will allow you to select from the drop down list of Notification Templates. Welkin provides two default Notification Templates: Default notification email template and Default notification sms template. You will also see any new custom Notification that has been created. Next, you will select the Event Subtype.
Event Subtypes
|
|
|
|
|
|
|
|
|
|
|
|
|
|
|
|
|
|
|
|
|
This is where you can select when and where in the system can be triggered to generate the User Notifications. Once you enter the preferred settings click Save Changes and Publish your draft.
Any questions? Reach out to your CSM or explore the Knowledge Base for more.