Knowledge Base
Care
Features Overview
- Encounters in the Patient Profile
- DrFirst: Reporting
- Labs: Health Gorilla
- Care: Home Screen
- Care: Programs and Phases
- Care: Profiles Overview
- DocuSign: Feature Overview in Care
- Bulk Edit
- Care Overview
- Home Screen
- Reports and Exports
- Documents
- Care Plans: Goal Tracking
- Forms and Assessments
- Care Teams
- Care Management Platform: Welkin Health Overview
- Charts & Graphs
- Communication Center
- Encounters
- Patient Profile
- Calendar
- Task Management
- User Profile
- Patient Profile
How To
- Charts & Graphs: Filter, change date and by data point
- Care: My Patients and Bulk Edits/Actions
- Logging in
- Encounters: Draft Mode and Finalizing Notes & Assessments
- Reset Your Password: Jira Service Management (JSM)
- Manage Unrecognized Communication
- Encounters: Create, Modify, complete
- Calendar: Setting Up Working Hours
- Create Calendar Events
- Upload Documents
- Creating Forms and Assessments
- Patient Profile: Editing Patient Information
- Patient Creation and Search Functionality
Troubleshooting/FAQs
Create Calendar Events
Care: How to – Create Calendar Events
Calendar Events can be categorized as anything other than a patient encounter, or anything (including Encounters) published to the Calendar via API. Based on permissions, Events and Leave Events (Out of Office Calendar placeholder) can be manually created and edited from the Calendar.
Follow these steps to create an Event manually.
- Click on “+ Event” in the upper right corner of the Calendar to open a sidebar
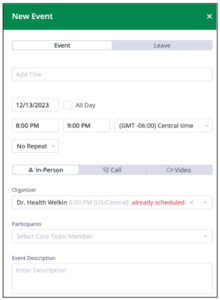

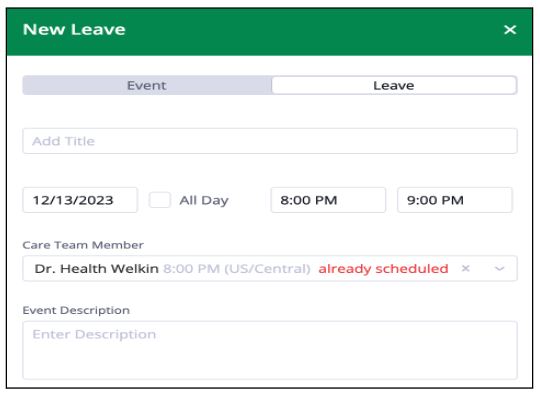
- The sidebar contains two tabs: Event and Leave: “Event” is the first tab accessed when opening the sidebar
- Add a title for the Event. This is the title that will appear on the Calendar
- Set the date and time. The displayed Time Zone is setup in the user’s profile in Care. The Time Zone for the Event can be changed by clicking the dropdown menu. Check the “All Day” box if the Event will last all day – This will schedule the appointment from 12:00 AM to 11:59 PM. The Event can be scheduled to repeat daily, weekly, or monthly. The default is “No Repeat”
- Select if the Event will be in-person or conducted via a call or video conferencing
- The default Organizer is the Event’s creator. This can be changed by selecting a user from the dropdown menu. User’s names can be typed into the dropdown menu to quickly find them. “Outside working hours” or “already scheduled at this time” messages will appear next to the organizer’s name if appropriate
- Select the participant(s), if applicable, from the Participants dropdown menu. Multiple participants can be selected. Searching for users and the “working hours” and “already scheduled” messages function the same way as they do for the Organizer
- Best practice is to include an Event Description at the bottom of the Event
- Click “Save” to create the Event
Follow similar steps to create a Leave Event. The differences are the Time Zone and Participant(s) will not be selected. The default Care Team Member is the creator of the Leave Event, although this can be changed to another user.
Click on an already created Event shown on the Calendar to edit it. Click on the pen and paper icon in the Event window that opens. The Event sidebar described above will open to the right of the Calendar. The Event can be changed to a Leave Event, or vice versa, by clicking on the “Event” or “Leave” tab and changing the date and time if necessary. The title, date, time, event type (In-person, Call, Video), organizer, participants, and description can all be modified.
Clicking the ellipses next to the Edit button will give the user the option to delete the Event.
For more information:
- Follow this link for an overview of the Calendar in Care: https://welkinhealth.com/kb/calendar/
- Follow this link to learn how to setup Working Hours: https://welkinhealth.com/kb/calendar-setting-up-working-hours/
- Follow this link to learn more about the User Profile in Care: https://www.youtube.com/watch?v=M_vXfIQuo0k
More Questions?
If you have any questions, please visit the Welkin Health Knowledge-Base or contact your Implementation/CSM for more information.