Knowledge Base
Integrations
Integration Overview
Integration Information
- Acuity Set up
- eRX: Implementation Checklist
- eRx: Overview
- eRx: Setup and Configuration
- eRX: IDP Quick Tips
- eRX: Tokens
- eRX: Completing the EPCS invitation and Logistical Access Control
- eRX: How to Reset the EPCS Passphrase
- eRX: Prescribe Tapered, Titrated, & Variable Dose Medications
- eRX: Reporting
- Labs: Overview
- Labs: Setup and Configuration
- Labs: Creating a Lab Order in Health Gorilla
- Labs: Creating a Quick Order Lab in Health Gorilla
- DocuSign: Implementation Checklist
- DocuSign: Authorization
- DocuSign: Setup and Configuration in Admin
- DocuSign: Setup and Configuration in Designer
- DocuSign: Feature Overview in Care
- DocuSign: Feature Overview in Designer
- DocuSign: Creating Templates
- Docusign: Go Live Process
- eSignature Configuration
- Zoom: Setup and Configuration
- Zoom: How to Configure Zoom in Designer
- Zoom: Where Do I Find My Zoom ID?
- Zoom: Setting Up Waiting Rooms
- Sisense: Change Requests
- Paubox: Setup and Functionality
- Google Calendar Integration
- Welkin Calendar Synchronization App
- Stripe: Setup and Configuration
- Candid: Setup and Configuration
- Candid Integration - Required Fields
- Pre-authorization
- Phone Tree Implementation
- Twilio: A2P Questions & Answers
- SSO Setup
- Configuring Google Single Sign On
- OneLogin: Setup and Configuration
Integration Support
DocuSign: Setup and Configuration in Designer
Overview
Customers can integrate their docusign account with Welkin. The Docusign integration supports in person signing and the ability to send to patients for remote signing. Once signed, the docusign document is saved in Welkin’s Document Management.
Docusign Configuration
To start using e-signing within Welkin, we need to complete the following 3 steps:
- Step 1: Admin Portal Configuration
- Step 2: Designer Portal Configuration
- Step 3: Authorization
In this article, we’ll cover Step 2. You can then click through to the other two links to view the other steps in the setup process.
To configure Docusign within Designer, you will first need a Docusign Developer account in order to create templates.
***If you intend to send Docusign via SMS, you will need to contact your Docusign account manager or call Docusign 1(877)720-2040. This functionality requires an account representative to initiate and can not be established while creating the developer account.
For more information on creating templates, please see Creating Docusign Templates
In this article, we will cover how to enable permissions within security policies and adding Docusign templates.
Designer Portal Configuration
Login to Welkin’s Designer Portal – https://designer.dev.welkincloud.io for the instance where Docusign will be configured. Here we will enable permissions for users and add template IDs.
To enable permissions for user
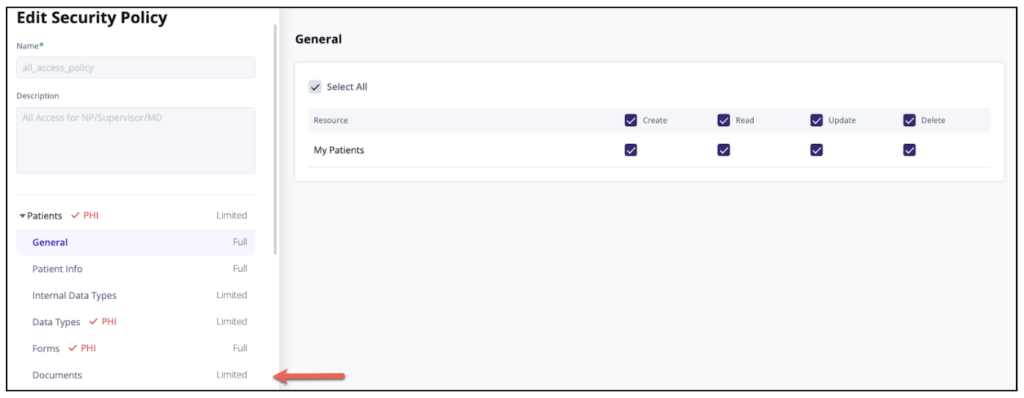
For the user to be able to perform e-signing in Welkin’s Care Portal, we must enable Docusign permissions in the relevant security policy.
In Designer Portal, go to Access Control > Security Policies

Create or select the policy where you’d like to control and set Docusign permissions.
In the vertical menu bar, scroll down and select Documents.

In the Documents column, there will be a line item for Docusign permissions. Check or uncheck the permissions related to this security policy.
***Note that there is a slide bar at the bottom of this section – please make sure to slide the screen all the way to the right to view all permissions.
Click on Save Changes once completed.
Please ensure this security policy is added to the relevant role of the users who will be performing e-signing.
How to Add Docusign Template
Please complete the prerequisite step of Creating Docusign Templates in the developer account
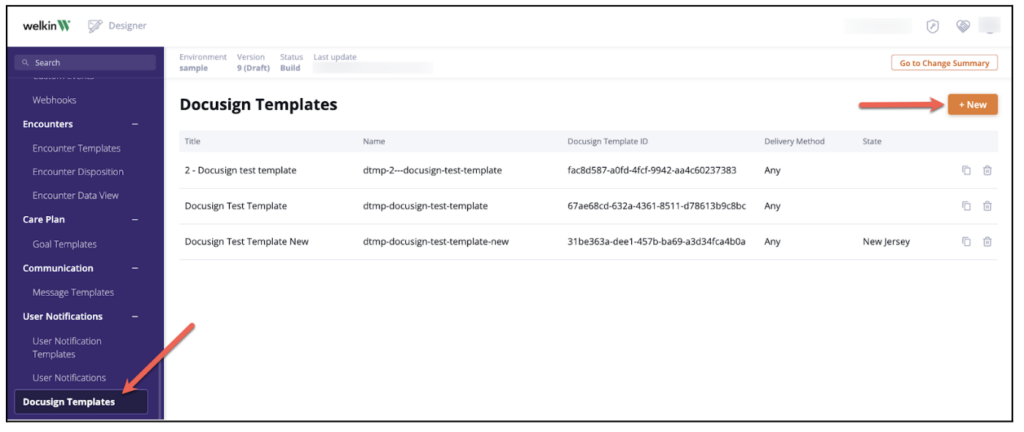
In the left hand vertical menu bar, select Docusign Templates and click on + New

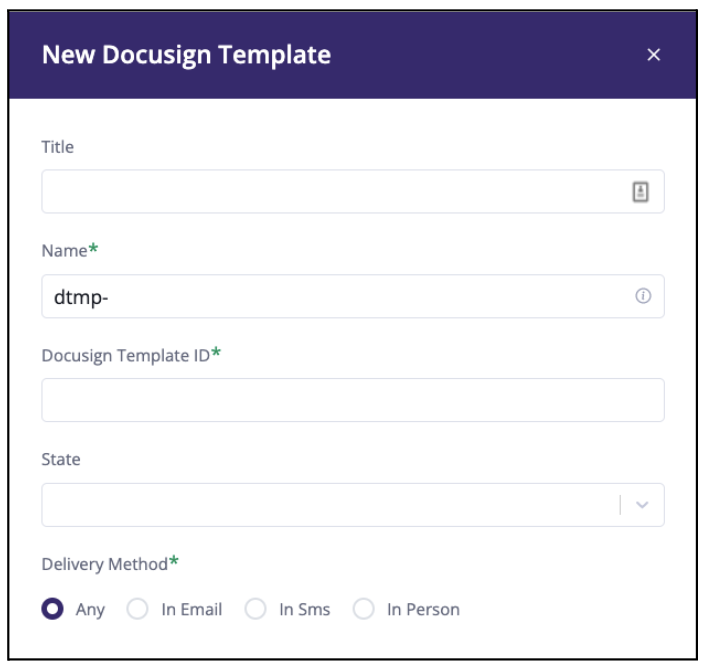
Enter the title and name of the Docusign Template

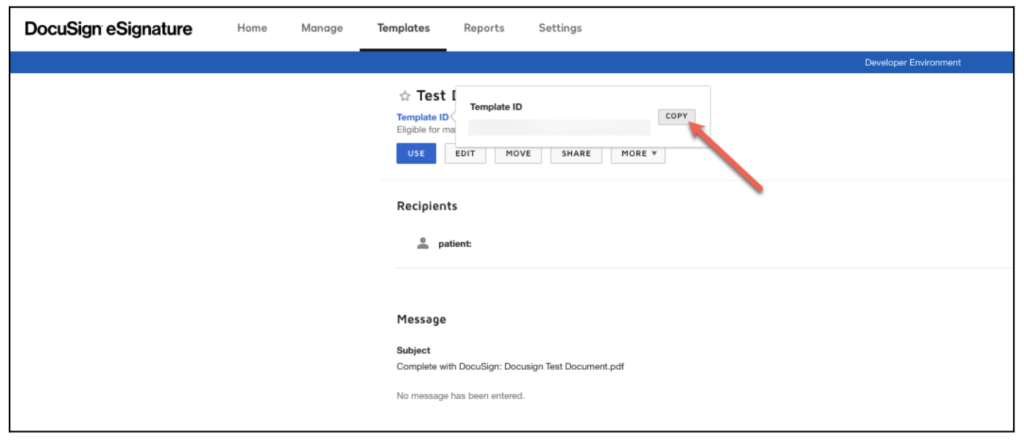
Enter the template ID. This ID is generated in the Docusign Developer account after creating the template. Click on Template ID to generate the code to enter into Designer

Enter the state, if templates will be State specific. Select the delivery or completion method of the template. Click Save.
For a more comprehensive setup and configuration document, please download this PDF.
More Questions?
If you have any questions regarding the Docusign Integration or its implementation, please visit the Welkin Health Knowledge-Base or contact your Implementation/CSM for more information.