Knowledge Base
Integrations
Integration Overview
Integration Information
- Acuity Set up
- eRX: Implementation Checklist
- eRx: Overview
- eRx: Setup and Configuration
- eRX: IDP Quick Tips
- eRX: Tokens
- eRX: Completing the EPCS invitation and Logistical Access Control
- eRX: How to Reset the EPCS Passphrase
- eRX: Prescribe Tapered, Titrated, & Variable Dose Medications
- eRX: Reporting
- Labs: Overview
- Labs: Setup and Configuration
- Labs: Creating a Lab Order in Health Gorilla
- Labs: Creating a Quick Order Lab in Health Gorilla
- DocuSign: Implementation Checklist
- DocuSign: Authorization
- DocuSign: Setup and Configuration in Admin
- DocuSign: Setup and Configuration in Designer
- DocuSign: Feature Overview in Care
- DocuSign: Feature Overview in Designer
- DocuSign: Creating Templates
- Docusign: Go Live Process
- eSignature Configuration
- Zoom: Setup and Configuration
- Zoom: How to Configure Zoom in Designer
- Zoom: Where Do I Find My Zoom ID?
- Zoom: Setting Up Waiting Rooms
- Sisense: Change Requests
- Paubox: Setup and Functionality
- Google Calendar Integration
- Welkin Calendar Synchronization App
- Stripe: Setup and Configuration
- Candid: Setup and Configuration
- Candid Integration - Required Fields
- Pre-authorization
- Phone Tree Implementation
- Twilio: A2P Questions & Answers
- SSO Setup
- Configuring Google Single Sign On
- OneLogin: Setup and Configuration
Integration Support
Pre-authorization
Definition
Payment pre-authorization is a payment process where funds are temporarily held on a patient’s account prior to an encounter. This ensures that sufficient funds are available to cover the expected costs.
The basis for pre-authorizing funds is determined by the total amount of services added to the encounter before the pre-authorization is triggered, calculated as follows:
- For Billing Type: Insurance, the Co-pay amount is used.
- For Billing Type: Self-Pay, the full service price is used.
- For Billing Type: Unknown/No Billing Type (considered being Self-Pay), the full service price is used.
Once a pre-authorization is scheduled or executed, manual invoice creation is disabled to prevent overcharging the patient. Any further actions, such as applying a cancellation fee, must be handled through automations or manual updates by authorized users.
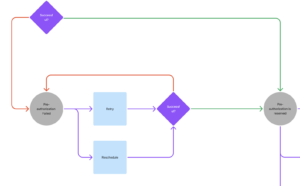
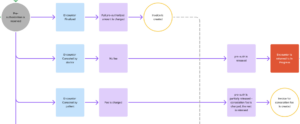
The entire workflow is illustrated in the diagram.
Pre-authorization Time
The timing for when a pre-authorization occurs is a configurable setting applied across the entire environment. This configuration can be adjusted in the Admin Portal under Payments Settings.
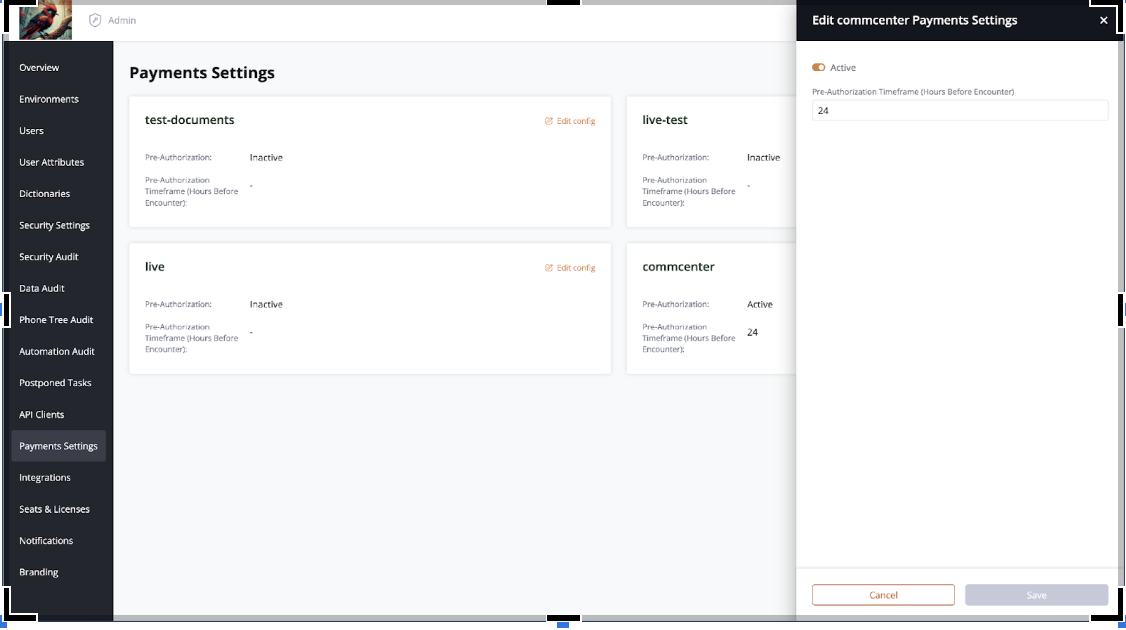
In this section, you can configure environment-specific settings. By clicking Edit Config, you can enable or disable Pre-authorization using the Active toggle and define the time period when pre-authorization for encounters will be performed.
Change Pre-authorization time
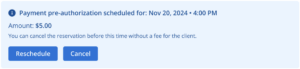
When a pre-authorization is scheduled for an encounter, a notification is displayed upon opening the encounter. This notification includes the scheduled time for the pre-authorization and provides options to either cancel or reschedule it.
Here’s how it appears in the Care Portal:
- If you click on the Reschedule button, a window will open in which you need to specify how many hours before the start of the encounter the pre-authorization should take place.
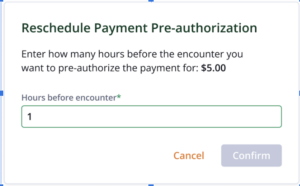
Once you specify the number of hours and save the changes, the pre-authorization time will be updated to reflect the new values.
- If you click the Cancel button and confirm the action, the pre-authorization for this encounter will be canceled, and a corresponding notification will be displayed

However, once canceled, the pre-authorization can be rescheduled by using the Reschedule button.
If you change the encounter start date, the pre-authorization will automatically adjust and be scheduled for the specified number of hours before the new encounter start time, as defined in the pre-authorization settings for that environment.
Retry
If the pre-authorization fails for any reason, a notification message will be displayed. After a failed pre-authorization, you will have the option to retry the process.
Below is a diagram illustrating this flow:
Here’s how it is displayed in the Care Portal:
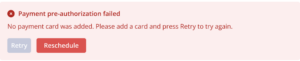
Once the reasons for the failure have been resolved (e.g., adding a patient card), the Retry button becomes available and you can click it and the preauthorization will attempt to run.
You can also transfer the preauthorization using the Reschedule button.
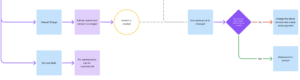
Pre-authorization Automation
For pre-authorization, automation can be configured to handle specific actions upon the completion or cancellation of an encounter. This automation can be set to either charge the blocked funds or release them, depending on the predefined settings. This ensures seamless financial workflows tailored to the encounter’s outcome.
| Event | Action | Description |
|---|---|---|
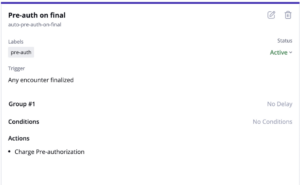
| Encounter Finalized | Charge Pre-authorization Action | Once the encounter is finalized, invoices will be created to pay for the encounter. The payment will include the funds that were pre-authorized as well as the services that (if) were added after pre-authorized was executed |
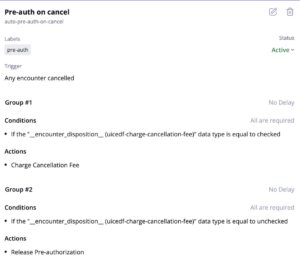
| Encounter Cancelled | Charge Cancellation Fee | The services that are added to the encounter have a Cancellation Fee field. In this case, when canceling the encounter, the sum of all Cancellation fees of the services added to the encounter will be charged. |
| Release Pre-authorization | Do not charge funds for cancellations |
This flow is summarized in the form of a diagram below:
Example of an automation for the completion of an Encounter:
To cancel an encounter, two distinct behaviors can be configured and linked to a specific field within the encounter disposition, for example, to a field that is filled in the encounter disposition:
Manual charge and release
When the pre-authorization is triggered, you can manually release the pre-authorization of that money or charge the payment.
Below is a diagram of this flow:
What it looks like in the Care Portal:
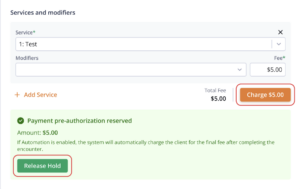
- Charge button – allows the user to charge (capture) the money for the encounter.
After confirmation, an invoice is generated for an amount equal to the current cost of the encounter. If no new services were added to the encounter and the cost of the previously added services remains unchanged since the pre-authorization, the pre-authorized amount will be charged. This ensures the patient is billed accurately without additional adjustments unless changes occur.
If additional services are added to the encounter after the pre-authorization, their cost will be included in the total amount charged in the invoice. In such cases, a single invoice will be generated for the total cost of all services. However, the invoice will document two separate payments:
- Pre-authorized Payment: Reflecting the amount already held during the pre-authorization.
- Balance Payment: Covering the cost of the additional services added after the pre-authorization.
If the value of the services changes after the pre-authorization, resulting in a lower total encounter cost than the pre-authorized amount, the system should perform the following actions:
- Charge the Updated Amount: The system will charge the patient only for the updated total cost of the encounter services.
- Refund the Remaining Balance: The system will automatically refund the difference between the pre-authorized amount and the updated encounter cost back to the patient’s payment method.
- The Release Hold button cancels the pre-authorization and releases the reserved funds back to the patient’s account. This action ensures that no payment is captured from the pre-authorized amount and allows the funds to become available for the patient immediately.
Once the cancellation is confirmed, the reserved funds will be released and will no longer be on hold. After this, the system provides the following options:
- Create Manual Invoices: Users can manually create invoices for any services added to the encounter.
- Reschedule Pre-Authorization: If invoices have not been manually created, a Reschedule button is displayed, allowing users to reinitiate pre-authorization for the encounter if needed.
More Questions?
If you have any questions, please email the Customer Success Management team at CSM@welkinhealth.com or contact your Implementation/CSM directly.