Knowledge Base
Integrations
Integration Overview
Integration Information
- Acuity Set up
- eRX: Implementation Checklist
- eRx: Overview
- eRx: Setup and Configuration
- eRX: IDP Quick Tips
- eRX: Tokens
- eRX: Completing the EPCS invitation and Logistical Access Control
- eRX: How to Reset the EPCS Passphrase
- eRX: Prescribe Tapered, Titrated, & Variable Dose Medications
- eRX: Reporting
- Labs: Overview
- Labs: Setup and Configuration
- Labs: Creating a Lab Order in Health Gorilla
- Labs: Creating a Quick Order Lab in Health Gorilla
- DocuSign: Implementation Checklist
- DocuSign: Authorization
- DocuSign: Setup and Configuration in Admin
- DocuSign: Setup and Configuration in Designer
- DocuSign: Feature Overview in Care
- DocuSign: Feature Overview in Designer
- DocuSign: Creating Templates
- Docusign: Go Live Process
- eSignature Configuration
- Zoom: Setup and Configuration
- Zoom: How to Configure Zoom in Designer
- Zoom: Where Do I Find My Zoom ID?
- Zoom: Setting Up Waiting Rooms
- Sisense: Change Requests
- Paubox: Setup and Functionality
- Google Calendar Integration
- Welkin Calendar Synchronization App
- Stripe: Setup and Configuration
- Candid: Setup and Configuration
- Candid Integration - Required Fields
- Pre-authorization
- Phone Tree Implementation
- Twilio: A2P Questions & Answers
- SSO Setup
- Configuring Google Single Sign On
- OneLogin: Setup and Configuration
Integration Support
Phone Tree Implementation
Basic and Advanced Phone Tree Implementation
Phone Trees are utilized in Welkin to route patient calls according to predetermined logic. The Welkin implementation includes a basic phone tree. If your organization requires call routing with more advanced features please contact your CSM/Implementation Specialist with your requirements to obtain a CSR.
Basic/Standard Phone Tree
As part of your Welkin Implementation you have the option of setting up a standard phone tree.
Clients can choose 4 decision types / options from the list below to be included in the Standard Phone Tree setup.
- Business Hours
- User work hours
- Leave event logic
- Patient Language
- Recognized/Unrecognized caller
- Number Input logic (press 1 for XXX, press 2 for YYY)
- Region/Territory routing logic
- 1 VM message
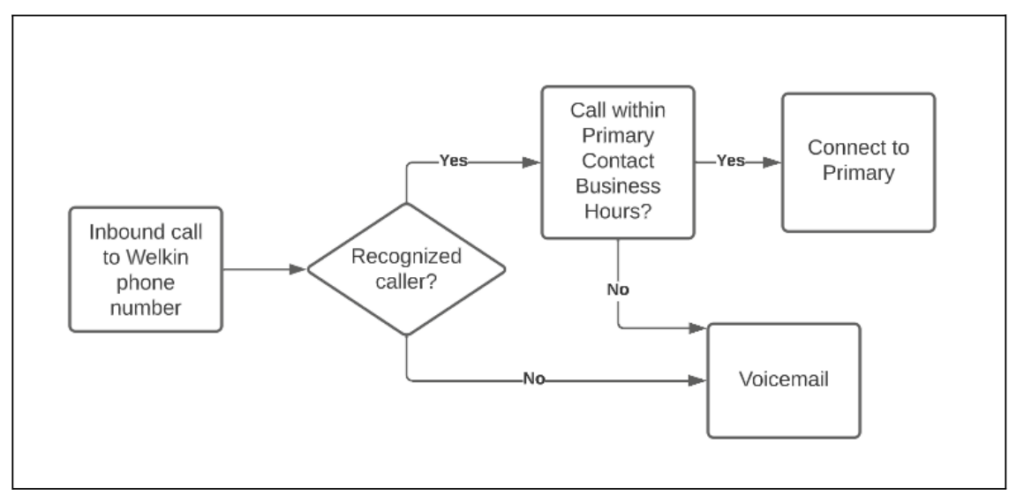
Below is an example of a simple phone tree that can be created in Lucidchart, Visio, or some other flowchart tool and given to Welkin Support for implementation.

***Additional inclusions will be reviewed by our Engineering team for PSE work and billed at an additional cost. Timelines for additional features may be outside standard implementation windows
***Welkin has the capability to stand up a 2nd phone number. Please reach out to your Implementation Lead or CSM for details
Advanced Phone Tree
An advanced phone tree contains more options and functionality than the basic/standard phone tree.
Please note – advanced phone tree’s will often require additional engineering time and are often release dependent. If you plan to utilize an advanced phone tree, it is recommended to have your requirements available early within the implementation process so it can be engineered, tested, and approved before your go live date.
Viewing the Phone Tree Configuration in Designer
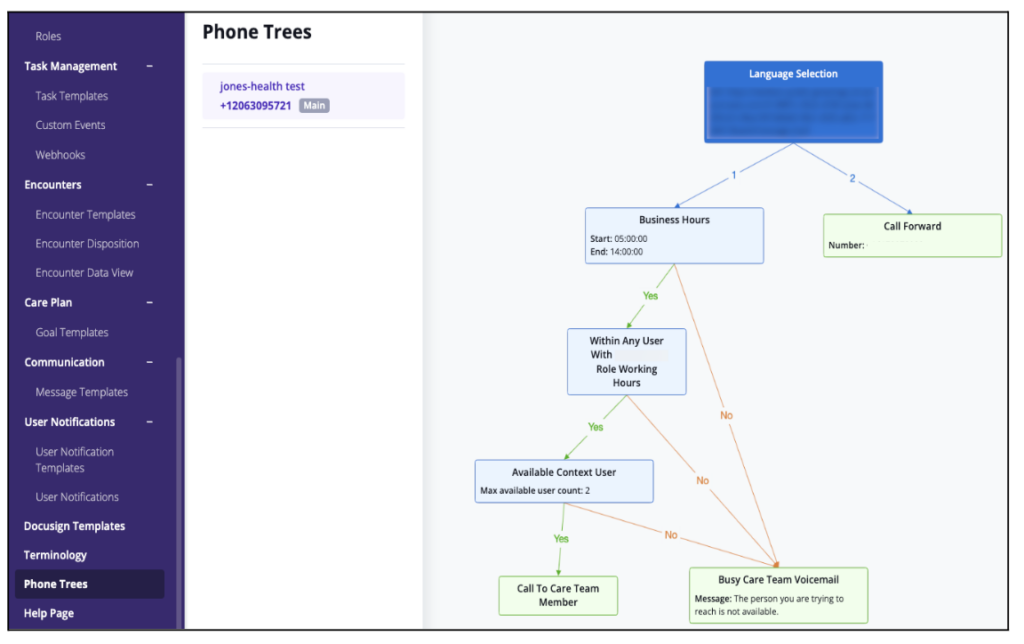
Once you log into Designer, scroll down to “Phone Tree” in the left vertical menu. Every phone number configured to receive inbound and/or outbound calls will appear under the Phone Trees heading. Click on a phone number to view the phone tree associated with that number. If you have multiple phone numbers, they can all have the same phone tree, different phone trees, or not have a phone tree at all if inbound calls to Welkin will not be used.
More Questions?
If you have any questions regarding Phone Trees , please visit the Welkin Health Knowledge-Base or contact your Implementation/CSM for more information.